
Update 2024:
Monkey Detector app based on TensorFlow Lite now available here: https://circusscientist.com/MonkeyDetector2.apk which is:
- More Stable
- Open Source
*Coming soon: New Monkey Detector – battery operated with WiFi controls, optional motion sensing, optional ESP-CAM addon for monkey detection..*
old version below:
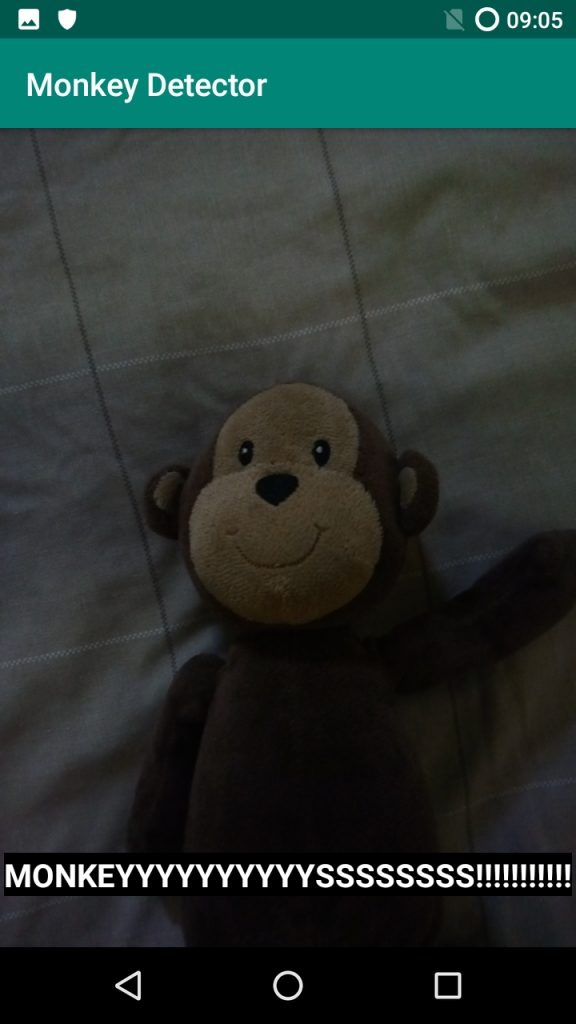
Lets start with a simple test here. We will set up a breadboard with the D1 Mini and modify the Android code to detect a stuffed toy (Teddy Bear) – I used a toy monkey but many stuffed animals are recognized by the fritz.ai pre-trained model.
What you need:
- Android phone to run the Monkey Detector App
- Android Studio
- Breadboard: http://s.click.aliexpress.com/e/KdMqDwrA
- D1 Mini: http://s.click.aliexpress.com/e/4Tb1vTn6
- USB cable to program and charge D1 mini: http://s.click.aliexpress.com/e/ltrlczMG
- Arduino IDE
Lets start with the D1 Mini.
Link to D1 Mini Firmware on GitHub
If you haven’t done so already, get the ESP8266 add-on for the Arduino IDE. The add-on and instructions are here: https://github.com/esp8266/Arduino
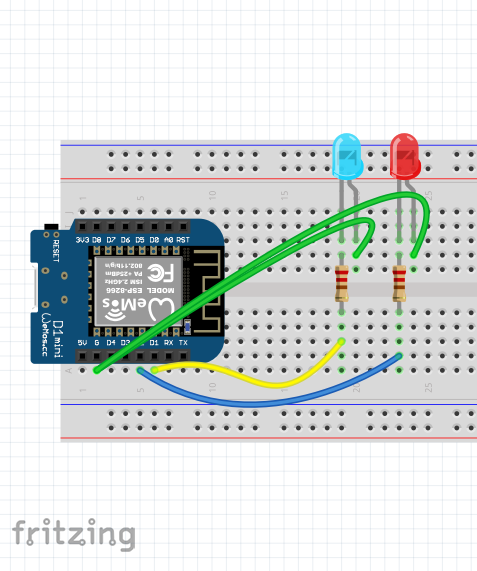
Set up the LED’s like this:
Download and get the code up and running on the D1 mini (any other ESP8266 board should be fine – you may need to change the GPIO numbers in the code, though). Modify the Arduino code to include your router’s IP address and password, as well as a static IP for the D1 mini.
Now use your browser to navigate to the address of the D1 mini (its static IP) For example mine was 192.168.8.13 – just type it into the address bar.
You will see buttons. Press them to control the two LED’s!

Sign up to fritz.ai:
In order to get the Android app running you need an api key from fritz.ai. Don’t worry they have a free plan, and the implementation in the Monkey Detector app is offline detection. This means that the app connects to the internet one time only to verify your key and then after that works completely offline. Fritz.ai can be found here. *update: Fritz.ai is deprecated as of end August 2022, so none of this will work anymore 🙁
The Android App:
The Android app uses the same http interface to control the LED’s. It is just pressing the buttons programatically.
Link to the Android Studio code for the Monkey Detector on GitHub.
Open the Monkey Detector project in Android Studio. There are a couple of variables which you need to change (in main.kt):
- Input your API code from Fritzing:
private val API_KEY = "place_your_API_Key_here" - Change the IP address for the D1 mini in all places where it is used:
http://192.168.8.13/socket1Onhttp://192.168.8.13/socket1Off - Change the compare strings line to detect your chosen object:
if (monkey.compareTo("monkey ") == 0 || monkey.compareTo("baboon ") == 0) {
changes to:if (monkey.compareTo("teddy_bear ") == 0) {
the space after monkey and teddy_bear is important
You don’t have to use teddy_bear though, you can detect whatever you want. Here is the list of possible objects to detect in this pre-trained model: https://gist.github.com/tomjuggler/da2fe289c1931c38880434e5c296014f
Now you can compile and run the code on your Android device. Don’t forget to enable developer mode and ADB.
Test the detector:
Now your object detector is all set. Make sure your phone is connected to the same network (Router) as the D1 mini running the LED sketch. The router needs to be connected to the internet the first time you start up the Monkey Detector app.
Run the app, accept the camera permissions (you may need to restart the app if it is not detecting anything on first run) and point the camera at whatever you set it to detect – in my case it was the toy monkey. The LED comes on. Also an alert sounds on the phone – my son saying “Hey you, get away from my lunch!”*
After the sound file is finished playing, the off signal is sent to the LED (the same signal which was sent when you pressed the buttons on the web interface).
Now it’s time to move on to the full version of the project:
Monkey Detector part 3: The Monkey Squirter
Or you can try out the Python version of the Monkey Detector using Pytorch.