
link to arduino code for poi on github
Just a couple of notes before starting, the ESP-01 is not breadboard friendly. In order to plug these into a breadboard you are going to need an adapter. Now this is not strictly necessary, you can use the D1 mini for testing here, and simply plug in the ESP-01 to the completed poi circuit (which uses a female 8 pin header for this purpose) but what about other projects? I made my own adapter using stripboard:
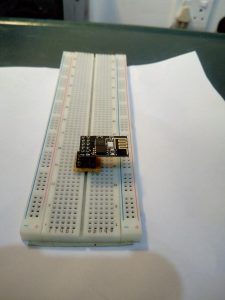
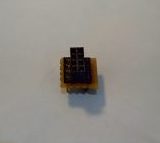
It has the female header on top and male headers on the bottom to go into the breadboard. Obviously the strip is cut in the middle to no pins are connected electronically. Here is the adapter on its own:
The circuit is quite self-explanatory. I am using an 8 pin header to connect all the wires to instead of soldering the ESP-01 in permanently, so I can update the code. In case you are wondering, yes, over-the-air programming is possible but you need to have 50% of the flash free to do it, and the full Smart Poi program takes up more than that.
As for programming, I am using this cheap USB adapter I found on Aliexpress:
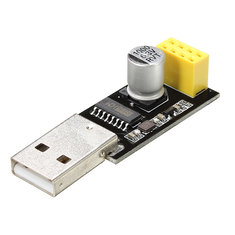
This thing works, with some difficulty, in combination with Arduino IDE to upload code to the ESP-01. A couple of tips:
To access programming mode you need a wire from GPIO 0 to GND like so:
I wrote a blog post a while back to do with solutions to some problems I was having uploading, it’s over here. This may be very out of date now..
Since then I have found that if the Arduino IDE is showing errors uploading you can trick it by pulling out the ESP-01, pressing CTRL-U (upload) and then quickly plugging the ESP-01 back into the USB adapter (still plugged into USB 2 port) – in effect switching it off and on again. So maybe ignore all that stuff about ‘not enough power’ in my earlier testing as this was possibly not true, at least it doesn’t bother me anymore.
Very important: the GitHub repo contains a data folder which must be uploaded to the ESP-01 (using “upload littlefs” on Arduino IDE) – see here for details on LittleFS file system with Arduino IDE.
A brief description of the full ESP-01 Smart Poi firmware:
There are two separate options in the firmware, called Main and Auxillary for the two poi The Main creates a hot-spot which the Auxillary connects to. If for some reason you are only using one poi (maybe a motor driven display?) use the Main one. They then sync up their timing via wifi.
* In the program you just have to change one line of code to switch from one to the other: boolean auxillary = true;
** similarly you can change the number of LED’s from 36 to 72.
There are backup images loaded into LittleFS (ESP8266 flash memory), which have to be uploaded separately via Arduino IDE, and can be changed over WiFi later. These images (and software defined patterns also included) don’t get displayed if a transmission is sent from the Android app, as this takes precedence. The Main Poi also serves up a web page which you can access via any browser, to change settings such as WiFi channel. These settings change options are mostly implemented in the Android app now, though.
The Android App streams images to the poi which are immediately displayed on the LED strip. I am working on a system to include more poi being controlled from one Android App – using an external router* – but right now it just sends to the two. Android app has image select (10 banks of unlimited no. of images), timeline (unlimited number of images set to music), brightness control, offline image bank change (5 banks – one is software defined patterns, the other 4 have 5 images each), computer generated images, beat detection FFT, zap game, WiFi channel change, and not yet included but coming soon, Text mode (right now this is a separate app).
*router code is actually on in the source github, but commented out as it’s not complete yet.
**multi-poi support and more is coming – check out what’s in store for the future: “Magic Poi”
On the desktop side there is a program to create timelines, and one to choose and upload the images to display offline on the poi, for Linux and Windows (should work on Mac too but I don’t have one, so..)
*update 2023 the uploading of offline images is done in a browser now. Code here.
UPDATES:Sign up for our update alerts: