K8 Virtual Juggling with working remote

K8 are my favourite type of LED juggling equipment. Recently I updated my virtual juggling web app to include a working remote control – just like the real thing.

The App

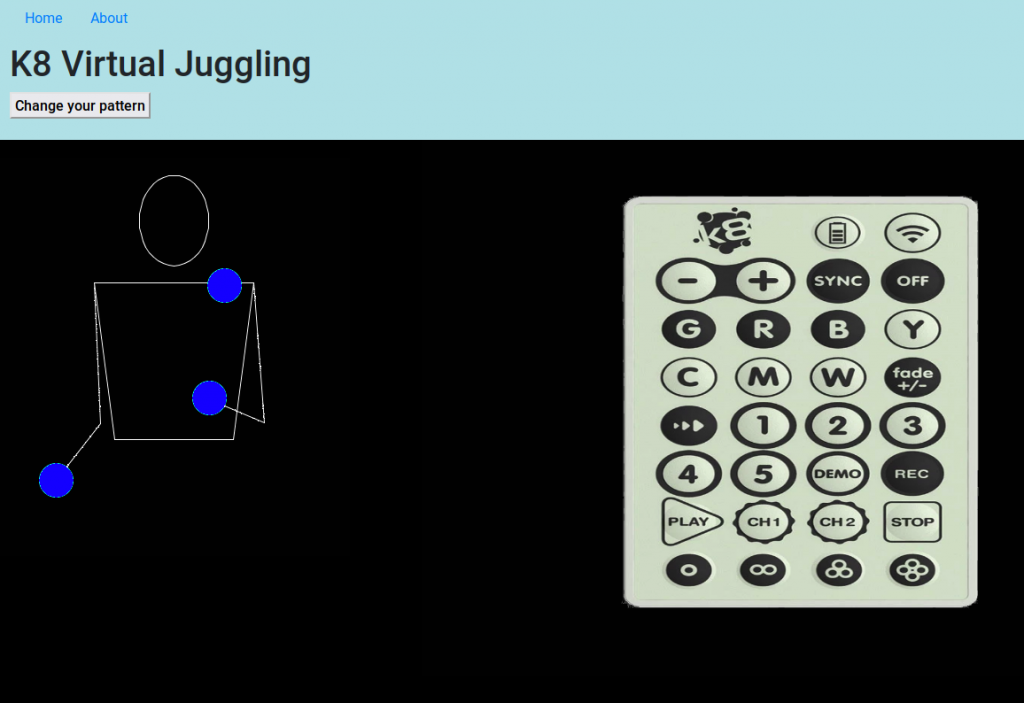
So the app consists of an animated juggler, a remote control and “Change your pattern” button.

While the juggler is juggling, you can press buttons on the remote to change the juggling ball colours (accurately emulating the actual K8 equipment settings)

The “Change your pattern” menu is a large list of different juggling patterns, which when selected will change the animation displayed.

How it works: back end

The back end is based on Flask. I am using the beautiful soup library to fetch the menu of juggling patterns from the awesome library of juggling website. Once selected, the gif of the pattern is fetched. It is then processed (a script inverts the colours and makes the juggling balls transparent) – if that hasn’t already been done for the particular pattern.

How it works: front end

The juggling animation and remote control are written with P5.js. The juggling ball colours are implemented as a background which shows through the transparent balls. The button co-ordinates are relative, so work on any size screen (looks best on Desktop)

K8 One Button Remote with Arduino Nano

This is a post for K8 juggling equipment owners who are also into electronics. If you haven’t already read it, here is here is why I made my own K8 IR remote.

If you don’t do electronics, but own K8’s, try the animated demo! (instructions below).

K8 One Button Remote

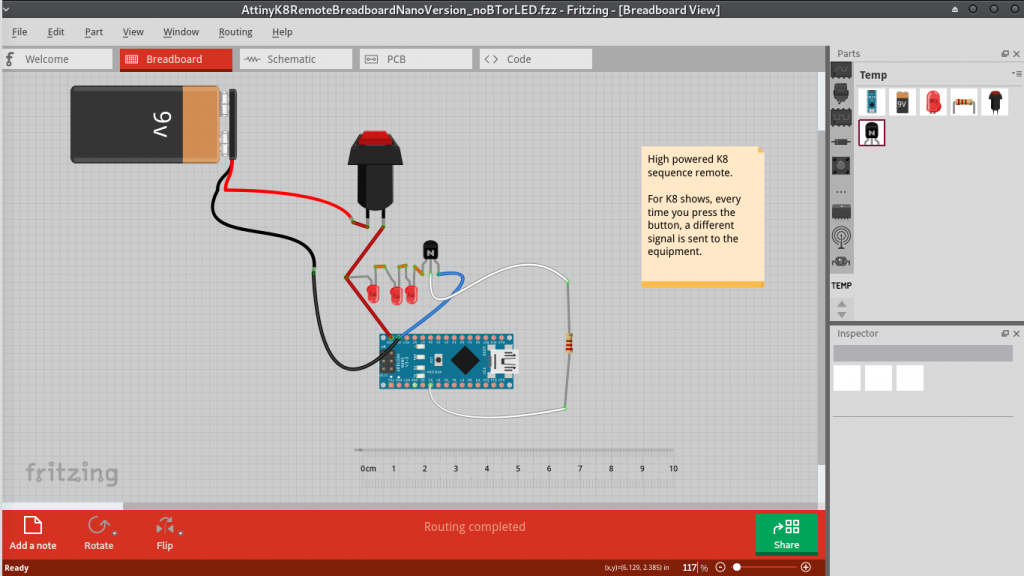
The circuit is quite simple. A 9v battery powers the Nano via Vin pin. A transistor receives output from the Nano, and this triggers a large current in the 3 connected infrared LED’s. The reason for the transistor is to maximize the signal, output of Arduino is only 5v but we need more for better signal range. You may notice that there is no resistor on the LED’s. IR pulses are extremely short ON/OFF pulses and so are not likely to blow up the LED’s in this implementation. I did have one connected previously but the range suffered.

I made a fun web program to demonstrate the functionality, you can see it here:

K8RemoteDemo

The demo works best on PC but you can see it on a mobile.

How to use it: click on some of the remote buttons, then press the big grey square at the bottom right to start (scroll down/across if you can’t see it). Press the bottom right square again to cycle through the saved patterns.

Refresh the page if you want to try again. Some of the buttons are not implemented yet (eg. Demo)
My favorite is probably fade, followed by no. 5 which is my favorite K8 pattern anyway.


This transmitter (at least with the IR LED’s I have) is more powerful than the K8 remote I received from them.

The code I will post in another article, however it is really simple, while the button is being pressed, the saved signal is sent, once per second (not more – one of my K8 balls has stopped receiving I believe due to too many signals sent*)

Stop pressing the button and the remote is off (saving battery of course) and next time the signal will be a different one, depending on the program.


*I am not a K8 engineer but their equipment stores the last pattern in memory. I believe that a piece of EEProm memory is overwritten each time the signal is received, so take care to not send too many signals, or your equipment may stop working. On Arduino chips EEProm memory is rated for 100 000 rewrites, obviously this is a minimum but evidently I exceeded this in some experiments.

k8 Clubs what are they and don’t they come with a remote already?

K8 prophecy clubs and balls come with their own remote, which controls all the colour settings. Why did I make another remote then?


Well, first of all, the clubs and balls may glow in the dark, but the remote certainly doesn’t*. The remote is very small and conveniently fits in a pocket, however it is virtually impossible to determine by feel which end is the business end. And by that I mean the end with the IR LED on, so that your hasty button presses actually have an effect… because as we all know, if you point the remote at the stereo, the tv will not change channels.

*Update: I wrote to K8 recently with regards to getting some new equipment, and it turns out their new remotes glow in the dark. They also have an awesome new record pattern function, to make changing colours easier. Can’t wait until I can afford the new K8’s!

Then there are the fiddly buttons, I have to admit my eyesight is not the best and I have broken too many pairs of expensive prescription glasses to hazard wearing them at my juggling gigs (juggling club to the face… it happens). So inevitably I end up squinting in low light trying to see which button does what, I quickly decided this was not the way I wanted my show to go.

Here is a shorter (low ceiling) version of my show running from an IR dongle, on a laptop, synchronized with some DMX lights via midi. Super complicated setup, I gave up on this after a couple of years of doing it. I needed an easier way…

Introducing the ONE button remote.

How does this work? One very prominent button, when held down will repeatedly send the correct signal for my equipment at the time I am pressing it. Once pressed, the program increments to the next required signal and that one is sent on the next button press.

One button, many signals. So now, in my show I occasionally hold up a remote and change the program on my IR juggling toys. I don’t need to be able to see the remote in order to do this, finding the remote takes no time (it’s tied to my homemade juggling equipment stand) and the button is big and can be found in the dark. Also the signal of MY remote is quite a bit boosted from the k8 version.

Here is an arduino sketch which demonstrates the principle (without the IR, I will share the k8 codes if anyone is interested).

EepromOnOffLedExample

Simply put, there is a number saved in EEPROM. Every time the Arduino boots up, the number is incremented, and saved again in EEPROM. The saved number corresponds to an IR signal. Thus a different signal each time. I make sure to loop the number back to 0 again of course at some point, otherwise the EEPROM register will overflow, blowing up the Arduino in the process I imagine 😛