Computer generated patterns – let me count the ways.
C++ code on-device – a simple for-loop using FastLED’s “Palletes”
Processing code – on Android, streaming to poi.
– created using Processing “Mask”, the coloured parts of the image change colour to create an ever-changing image sequence. I also implemented a sound activated version which shows a pattern according to volume on different frequencies (“Beats”) and a static “Cylon” effect (“Zap Game”)
Similarly C can be used to stream generated patterns to the poi (see here).
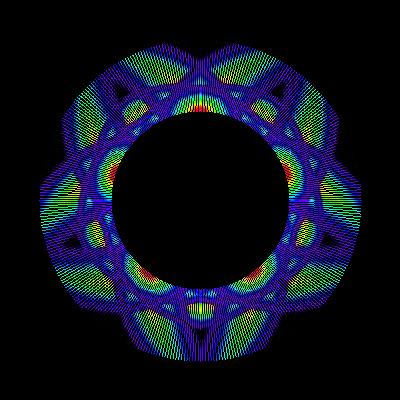
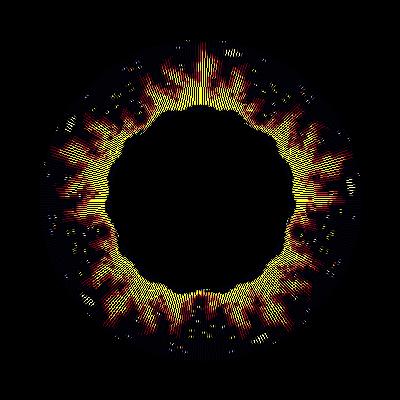
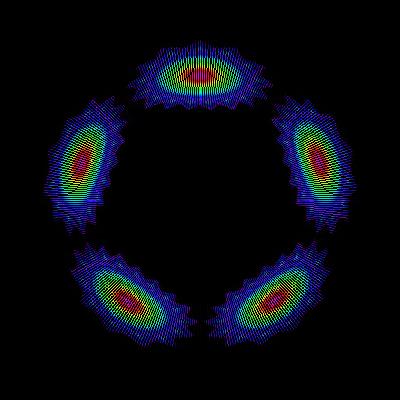
I have experimented with AI generators using different prompts – for example: – These are from “Midjourney”
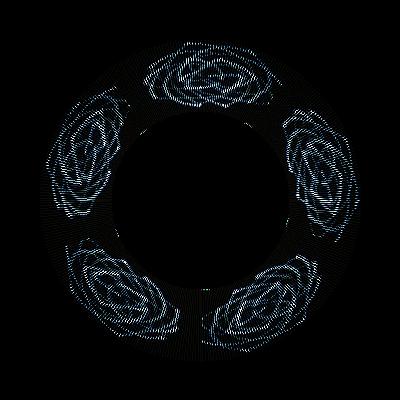
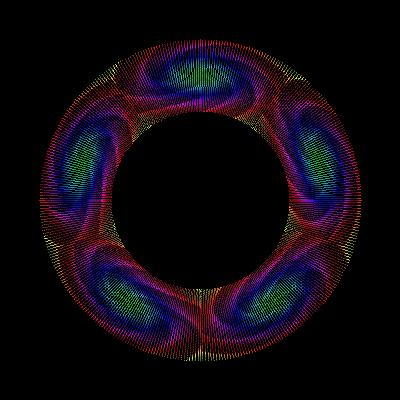
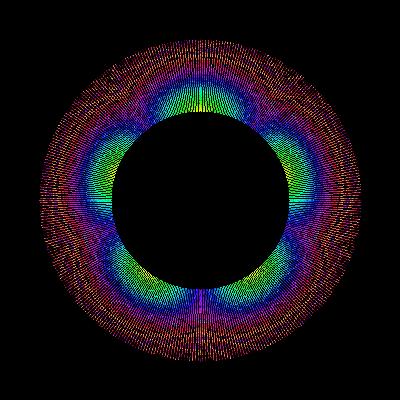
Finally, my current mission, using P5.js within the magicpoi website to generate pics with code. Examples:
Example:
The above example creates an infinite succession of 72x72px images – perfect for display on my 72px poi. I adapted the code from this showcase example on the P5js website.
My plan is to add this – and many more – options to the magicpoi website. They will complement the user generated images and be downloadable directly to the internet connected Magic Poi.
PS: Currently, if you want to see what any of the images generated above will look like on the poi, you can right click on the changing image, select “open image in new tab”, download the image and then on the magicpoi profile page (you need to be signed in for this to work – sign up, it’s free!) select upload and drag the image onto the page, or choose it from the file menu. Then you can turn this: into this:
As you can see, the possibilities are endless. I plan on making the P5.js image generation into a plug-in system for Magic Poi.
A fair amount if I am going to be honest here. The problem for me always comes down to syntax. Currently focused on Full Stack IOT development my day consists of switching between coding in Python (Flask api and web back-end), JavaScript (with JQuery for front-end) and C++ (embedded).
I find that one of the more interesting parts of any Full Stack IOT code base comes down to dealing with requests and responses. A website has a login page, sends a request to the server. An IOT device has a key to access the online api, sends a request to the server. The server needs to respond but first check the input is valid (sanitize it).
Python/JavaScript/C++ all have their own ways of working with text input. In JavaScript for example you need to trim() but in Python it’s strip() – and in C++ (embedded) it’s a bit more complicated operation involving char arrays. The point is that when switching around between languages I sometimes find myself going blank on the specifics of each approach. That’s when ChatGPT comes in handy for me – as a helper, faster than a google search.
I recently came across an issue which was helped by ML in a different way – namely parsing unstructured text input.
The Problem
I had a series of spreadsheets which I was extracting data from (using Pandas) but the date format was unfortunately unstructured. For example:
12th, 13th Dec 2022 and 5th-8th Jan 2023
In order to continue with the project I needed the date in Pandas date format
2022-12-12
If you give it “12th December 2022” as an input, Pandas can do this for you, but it couldn’t cope with the format in the spreadsheets. Regular expressions weren’t going to do the job either, considering the range of formats. So I asked ChatGPT. The prompt:
Please can you parse the following dates as separate dates in list format, suitable for python pandas usage:
12th, 13th Dec 2022 and 5th-8th Jan 2023
As you can see, this is exactly what I was looking for! Unfortunately my ChatGPT free trial has ended – not that I am opposed to paying for software but that’s not the only issue stopping me from using the api for this. I have been burned in the past by proprietary software solutions which have arbitrarily changed and/or cancelled a product which I relied on. This is a simple use case but I can imagine myself taking advantage of it more and more, then OpenAI pulling the rug (or just raising prices) and leaving me with a whole bunch of useless code.
The Solution:
After looking around I found NLPCloud (no affiliation, just it looks cool and works for me*). They use Open Source Generative AI models which in theory I could replicate and host anywhere. I decided to give it a try.
It works! The free plan api key is now plugged into my program and when my program encounters a date format it can’t deal with, a query is sent.
response = client.chatbot(f"Please can you parse the following dates as separate dates in list format, suitable for python pandas usage: {dates_unformatted}", "Human asking AI for help with a text summarization task. ", []) #text, context, history
The response is exactly the same quality as the ChatGPT one, using the “finetuned-gpt-neox-20b” model.
What simple things has ML been helping you out with?
*Update: A couple of months later, tried out NLPCloud again and it’s broken. Luckily the same code works fine using hugging-chat-api. I really need to get onto self-hosting, every api breaks sooner or later it seems.
Currently the Magic Poi site relies on some Processing (Java) code which is called from python – as well as other bash scripts to do certain things. I wanted to make it faster and cleaner by using Python for everything, so I did some test scripts. (Github). Also, the Processing code required a virtual screen buffer to run on the server constantly!
The main functionality involves compressing images into the .bin files which are saved to the poi memory for display. Since there is limited memory, and to save bandwidth, I am using the R3G3B2 algorithm to compress images. The poi only accepts images which are rotated 90 degrees clockwise, so that needs to happen too, as well as dynamically re-sizing any images which are wider than the 72px available.
I am still conflicted about whether to keep the Android app as the control for the poi, or to do something else, but making everything available as an api on the server keeps it flexible for now. The RotateImageVisualPoiStyle api can be accessed right now. Upload your image, and see what it will look like on the poi!
# change the /path/to/image.jpg to your own image file name
curl --location --request POST 'http://magicpoi.circusscientist.com/api/rotate_visual_poi_style' --form 'file=@"/path/to/image.jpg"' --form 'fixed_width="72"' --output 'rotated_image.jpg'
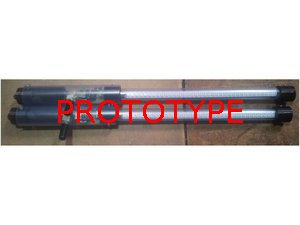
The factory where MagicPoi were being developed had a fire last month! All of the prototype poi melted, so all I have left is my breadboard version. This is going to cause some delays..
Updates:
The Magic Poi website now saves .bin files for every image uploaded. This is accessible via an api which I am working on accessing from the ESP32 and ESP8266. The .bin files are byte compressed images for display on the poi.
Example – list all shared .bin files on the server: curl http://magicpoi.circusscientist.com/api/get-filenames
One thing to note is that for testing purposes, all new .bin files are shared now. Please be aware that your images could be accessed (temporarily). This is because authentication is an extra step, so I’m working on the basic functionality first, with a public folder. The authentication works using jwt and I am having to access it from Java and C++. I already have a working Arduino test code which implements jwt correctly – security is important, so I want to do it right. One problem I already had to overcome is the fact that LittleFS file system has a limit of 31 characters for filenames (including path). The randomly generated filenames on the server are longer than this.
Not sure if I mentioned this before, the SmartPoi “Upload for offline use” option in the Android app doesn’t upload the whole image at the moment. I am not sure why, perhaps it’s something to do with the timing loop moving to the next image too fast. This option is going to be replaced by the web api anyway, so it’s not a priority, but I have compiled a desktop app which I use for converting and uploading (Linux only). You can get that for 36px here or 72px here – it can upload 20 images, just drag and drop your pics (need to be 90 degrees rotated, unlike the website) onto the window, connect to Poi AP and press “Upload”. You need to extract it and run from the command line but it should work on any Linux distro (tested on Ubuntu and Arch). At some point I will probably get annoyed at having to use my Laptop to upload images and fix the app though. Do email me if you need this for Windows, I might be persuaded to compile it for you using a VM if you ask nicely.
With the new APA102 2020 version being more available now, when Magic Poi is eventually launched it will have at least 100px, I’m thinking 128 is a good number but don’t quote me.
You may have noticed all of the hype around AI lately. A few years ago I used GAN with PyTorch to generate images for the poi (after training with around 100 poi pics, probably not enough). It was a big fail, but maybe it’s time to take another look. Would it be cool if you could just tell your poi what type of image you want to display, and it did it instantly? I do already have loads of Processing sketches I made to try and computer generate nice pics (some are on the Android App).
I missed two goals in the World Cup Finals because of this. It’s not the first time Snap has been a problem, but it’s most definitely the last straw.
What happened?
I was happily watching the second half of the Fifa World Cup Final, using “ShowMax” – a South African paid streaming platform, on Firefox. All of a sudden the screen freezes and the Firefox Snap decides to update. I couldn’t even close the window to open up Chromium.
In a panic I force shut down the laptop but somehow the boot-up wasn’t recognizing my hard drive anymore?? I don’t know what happened there, it works now, maybe I pressed the power button too many times – I was IN A HURRY.
I ended up watching the rest of the game on my phone.
Go Argentina! If my team hadn’t won I would have probably been even more pissed.
It’s the last straw Ubuntu – I have heard that Snaps have added an “Experimental” option to ignore updates but that’s not good enough. I’m moving to something that gives me full control. You can say what you like about me – It’s my fault for using the “Schedule updates for Sunday night” option and forgetting about it, or not using the new “Ignore updates” feature I only found out about on Reddit last week, but I’m done.
From now on, I love Arch
I am going back to Arch. My computer is my computer, and I don’t care anymore how much work it takes, I’m going to take charge so nothing like this ever happens again.
Look forward to a follow-up article where I rant about annoying Arch flaws and insane breaking changes in updates. \s
My K8 Prophecy clubs have reached the end of their tether. After 8 years of use! First of all, many thanks to K8Malabares for their excellent equipment. Most smartphones won’t last that long (except for my Samsung Galaxy S2, which still works). If you need juggling equipment you can’t go wrong with K8. I have some of their non-LED equipment as well and it’s just as good.
Upgrade
About six years ago I did an experiment – to see if I could emulate the K8 IR code on an Attiny85 chip. I knew they used that chip, or possibly the Attiny45, because one of my clubs was faulty and I opened it up to have a look – K8 sent a replacement, by the way, talk about great customer service!
Now that my balls and clubs are not working anymore, due to the battery reaching end of life, it’s the perfect time to test out my new code. Luckily K8 didn’t solder their chips, instead opting for a convenient chip socket for easy replacement! I made some updates to the code, adding new functionality and colours. (K8 have also done an update since I bought my equipment) The most important, for me, was adding a timeline record and playback. This means that I can record the timed colour changes for my entire show into the chip via IR remote, and play it back (in time with the music) by pressing a single button. This is similar to how Aerotech Ultimates used to work.
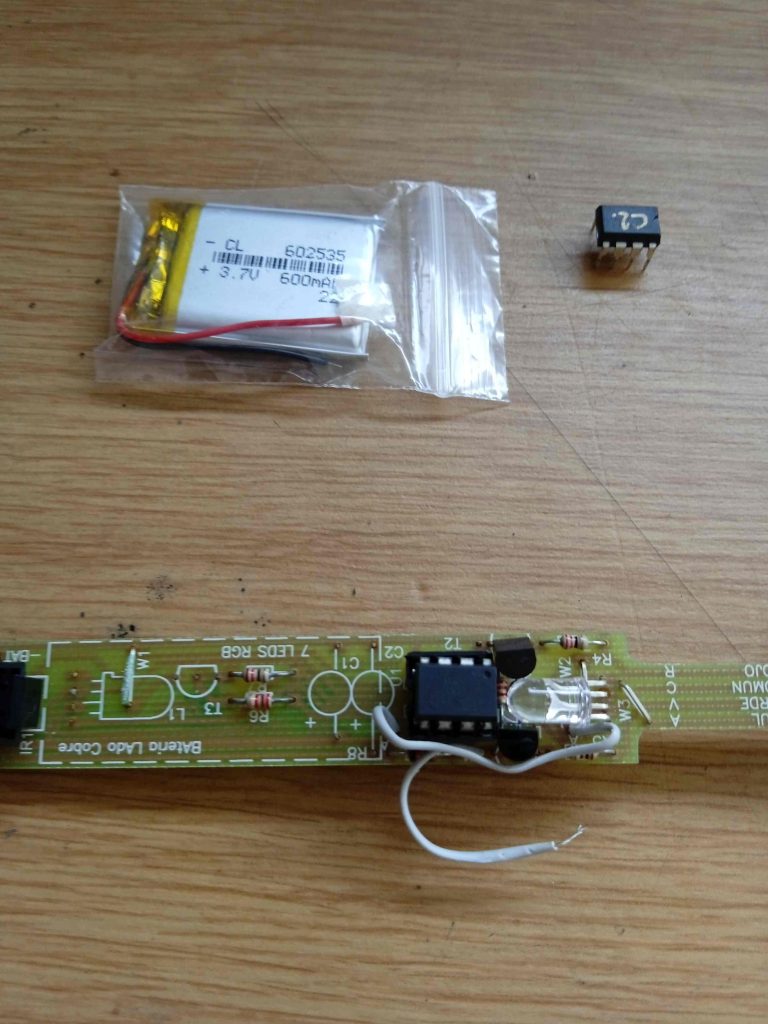
The batteries were the main thing. K8 use lithium batteries with 250mah power. I found some batteries online with a capacity of 600mah which I thought I could make fit (see below for details – not quite, but I made it work). I also bought a cool new charger for the new batteries.
The procedure
For anyone who wants to try and do this, I am posting some tips and photo’s.
1. Taking apart the club
Pull off the tape from the center, then pull out the staples:
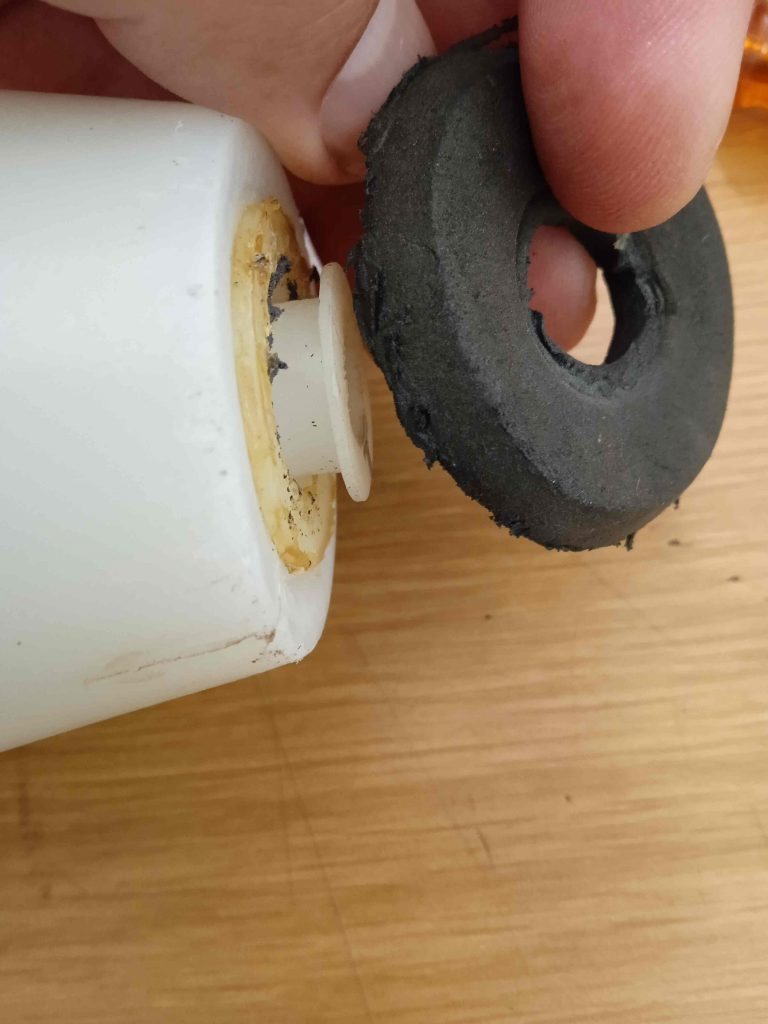
Take off the knob and top bumper:
Pull off the plastic around the handle, then unscrew the plastic spacer (needs an allen key)
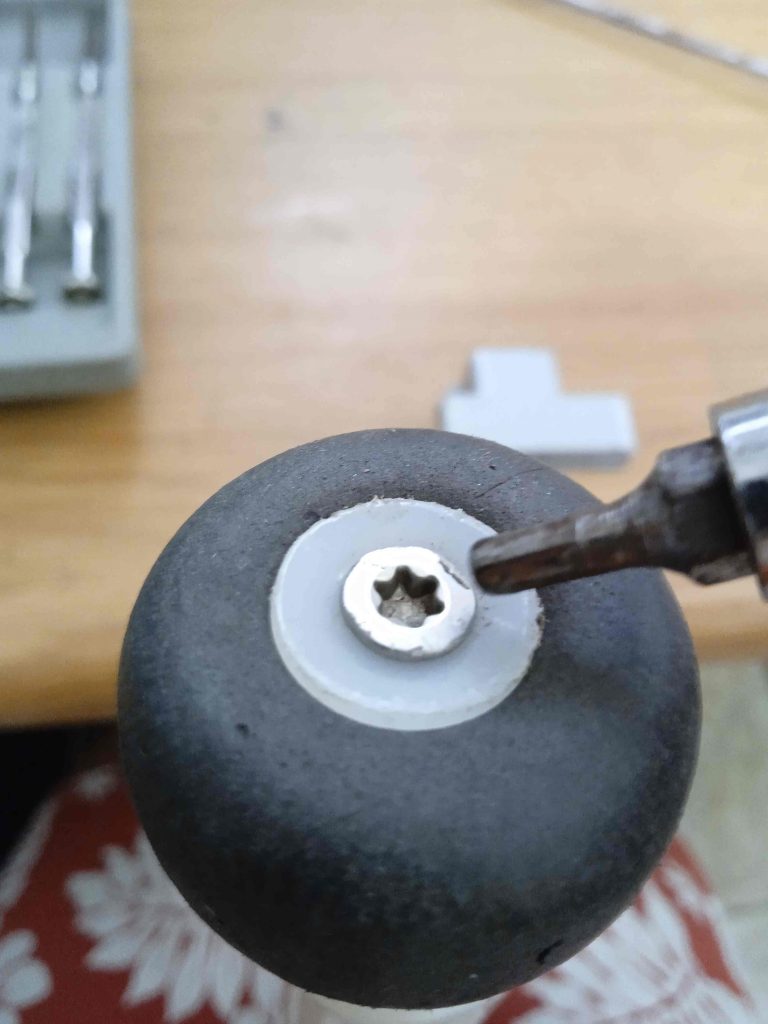
The next part is really sensitive – make holes in the top of the bulb cover to let the inside pipe come out. Get it out by pushing from the bottom – I also shoved a dowel inside and pushed upwards. If you use too much force this plastic pipe could bend, so be careful.
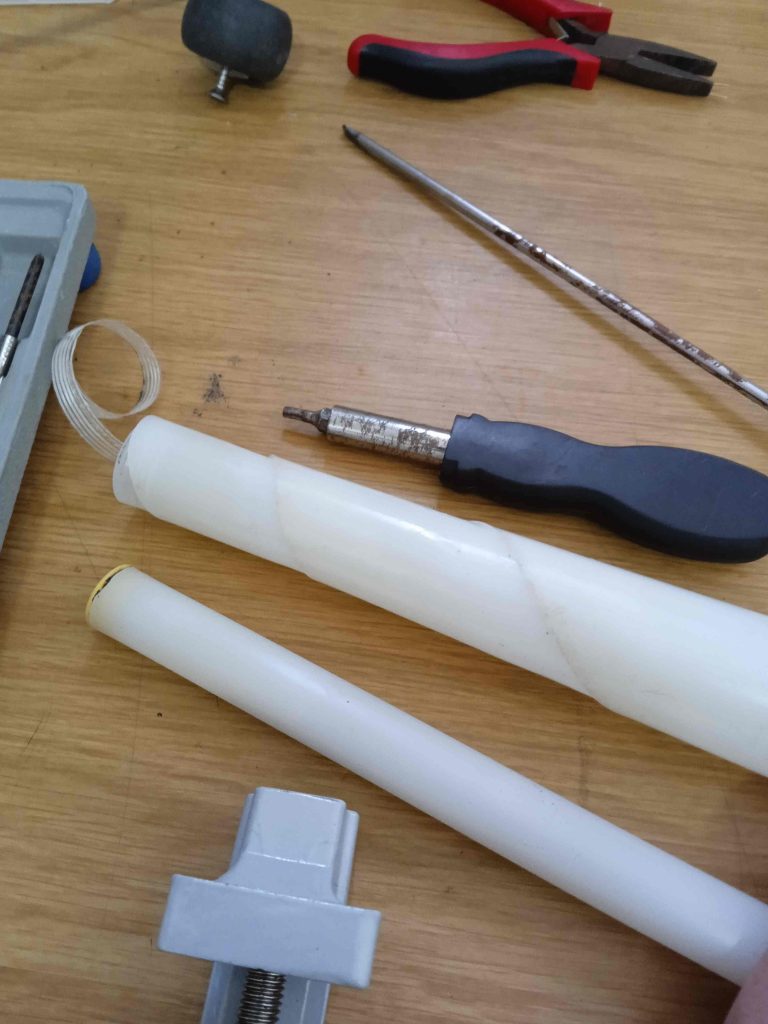
Now pull out some more screws holding the thicker top piece of the inside pipe on, and pull the spacer out to let the electronics out.
The bottom thin pipe should come off easily, leaving the bare circuit board.
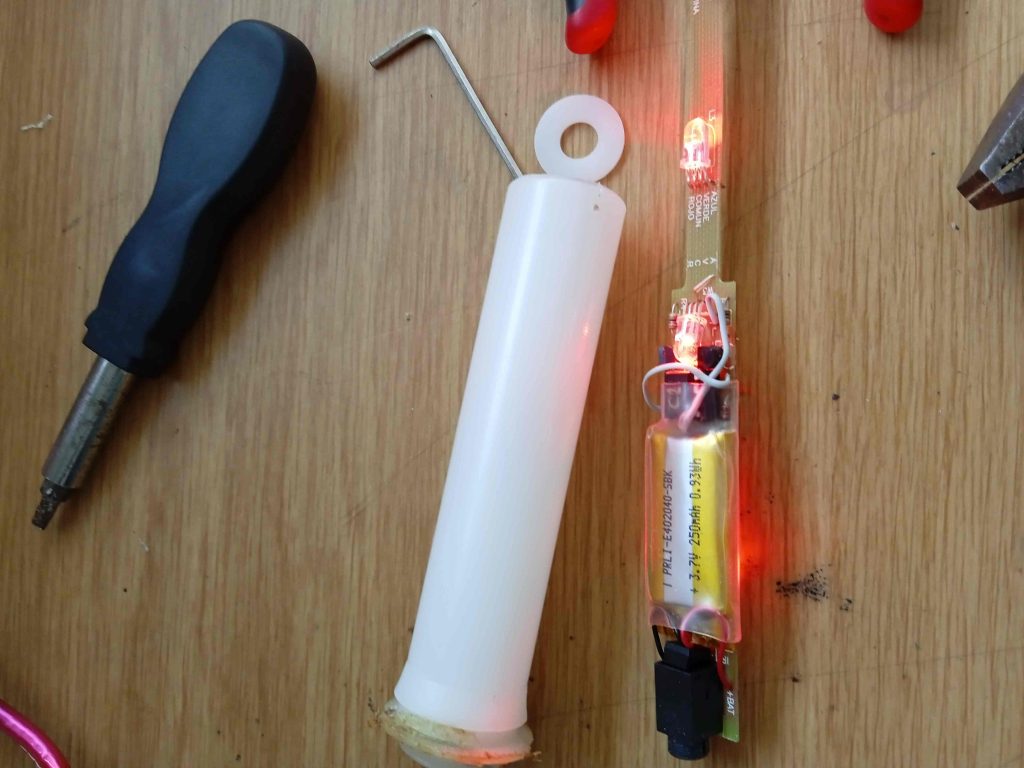
Now cut off the insulating cover, exposing the battery. See how fat it is!
Pull the battery away from the board (carefully) and cut the two wires as close as possible to the battery – we need those!
The new battery ready for placement. Also, my newly programmed chip in place (old one from K8 labelled C2.
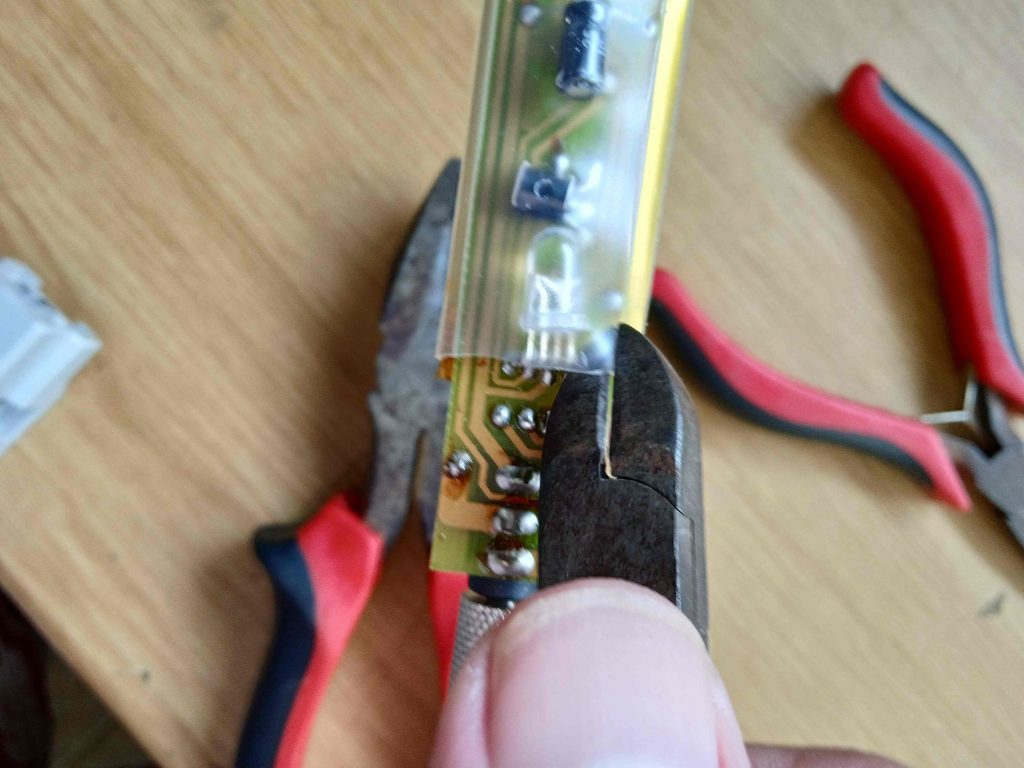
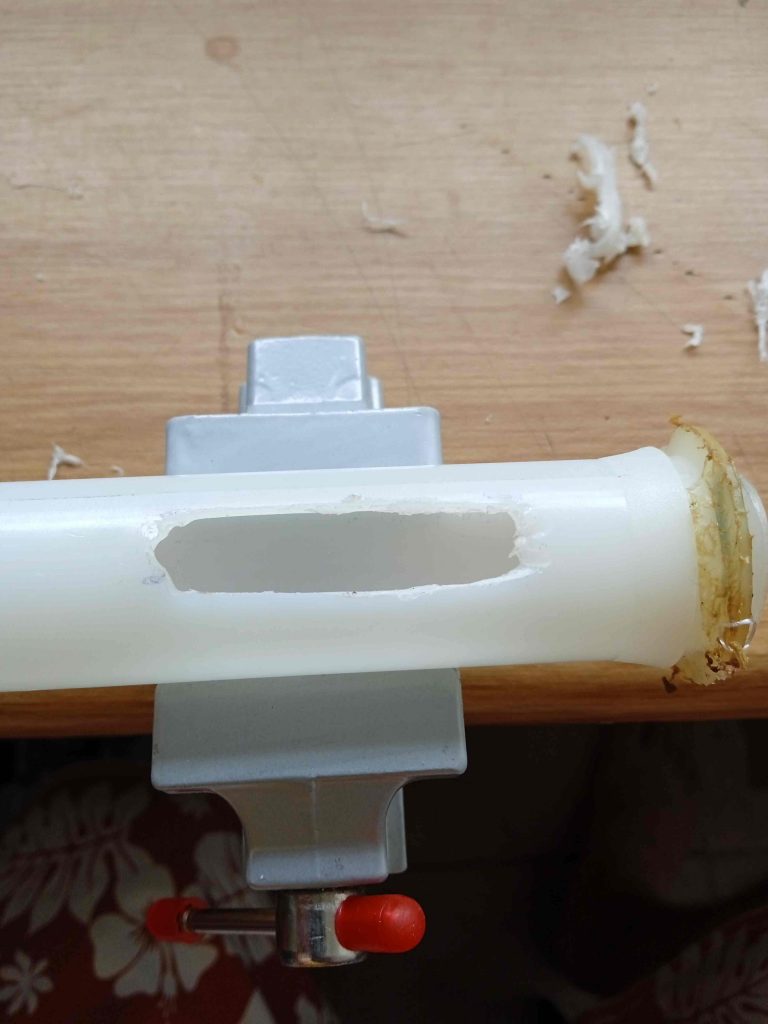
Now comes the hard part. Making space for the new battery. I had to cut into the larger diameter tube on both sides so that this could fit. I actually bought a Dremel to do this job.
Now put the circuit back into the top pipe, and find the battery wires. Then solder the battery on – finishing with insulation. The battery should fit with only a little bit sticking out on both sides of the pipe.
I used clear tape to stick the battery in – it was already pretty snug as the holes were just right.
Putting it back together
Just like taking it apart, only in reverse (and much easier)
Put the longer circuit cover tube back in and line up the holes (with the spacer), then put the screws back in. This works fine with just pliers, just twist left and right for these, while pushing in firmly:
Now the inside tube goes back into the top of the bulb – it just snaps in easily (how hard was that to take out, though, whoah!)
After putting the top bumper back, the middle spacer goes on. I forgot to mention, that doesn’t come off without removing a plastic screw cover (yellow, bottom of thin tube) so keep that in mind if you haven’t taken this apart yet.
Finally it’s time for the wrapped plastic handle – I didn’t put the staples back, you are welcome to try and do that..
Add some tape to keep everything together, screw on the knob and your club is “as-new” again.
Just a quick tip, I noticed that there is a bit of wear where the circuit goes from thin to thick (you will see what I mean – the long bit with all of the LED’s. Some of my clubs had non-working colours due to this, and I had to bridge the gaps with wires.
Let me know if you have K8 clubs and are interested in upgrading yours, I am happy to answer any questions.
Recently I found out that PHP 7.4 is going to reach End Of Life at the end of November, 2022. This was an unfortunate situation considering I have several websites running on a couple of Ubuntu Server 20.04 DigitalOcean Droplets. It’s unfortunate because I found out that the only supported version of PHP for Ubuntu Server 20.04 is the soon to be obsolete version 7.4.
The Solution
There are two ways to do this – upgrade PHP via a PPA on Ubuntu 20.04, or upgrade Ubuntu to 22.04. I already upgraded my desktop without any issues, so I went with the latter option.
I will outline the procedure I used below. It went without a hitch, apart from having to do it twice due to a broken WordPress plug-in. I am embarrassed to admit that the plug-in was my own creation (in my defense I am not a PHP developer)
Check all WordPress plug-ins for compatibility with PHP 8.1
Power on the new server, login and proceed to upgrade to 22.04. I used screen to keep the upgrade process alive in case of ssh dropout.
Once this process is completed, you still need to switch the version of PHP that Apache is using (I’m not sure if this is necessary for Nginx). It was something like: sudo a2dismod php7.4 sudo a2enmod php8.1 sudo service apache2 restart
In the control panel, switch over your website’s DNS to point to the new domain. Depending on TTL this can take a while to propagate – I did mine one at a time and checked them with the ping command. ping circusscientist.com – returns the IP address
If anything went wrong, it’s easy to switch back to the old 20.04, so I left that running for a few days. Worpress.org has some great articles here and here which I sometimes use to help with troubleshooting
Finally, switch off the old 20.04 server and remember to delete it (keep the snapshot, though, just in case!)
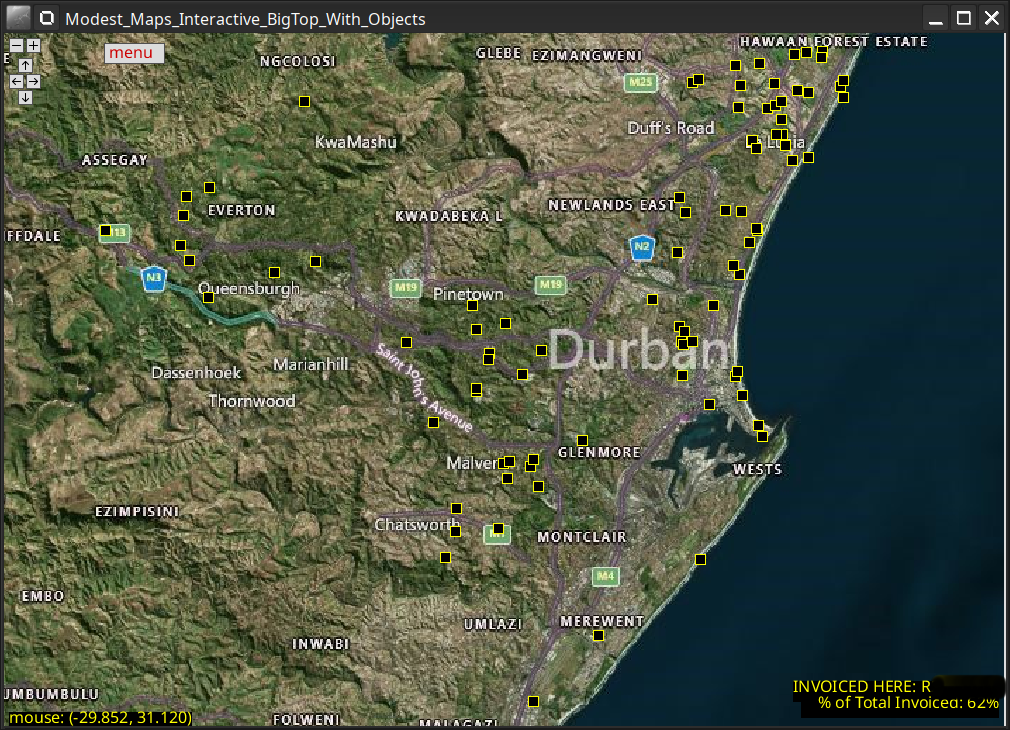
I do shows all over Durban and surrounds – but where exactly? And which areas are the most lucrative? To work that out I made an interactive Desktop app using Processing and the Modest Maps library. To get the points on the map I used Google Geocoding api.
Map details page
How it works
The process is quite simple, I create a csv file from our records, with the customer address and total invoice amount in columns (as well as blank latitude and longitude columns).
I created a start screen to choose which csv to use for the visualisation, with an option to fill in the locations using Google geocoding* api.
*geocoding is taking an address and turning it into location co-ordinates.
Menu page
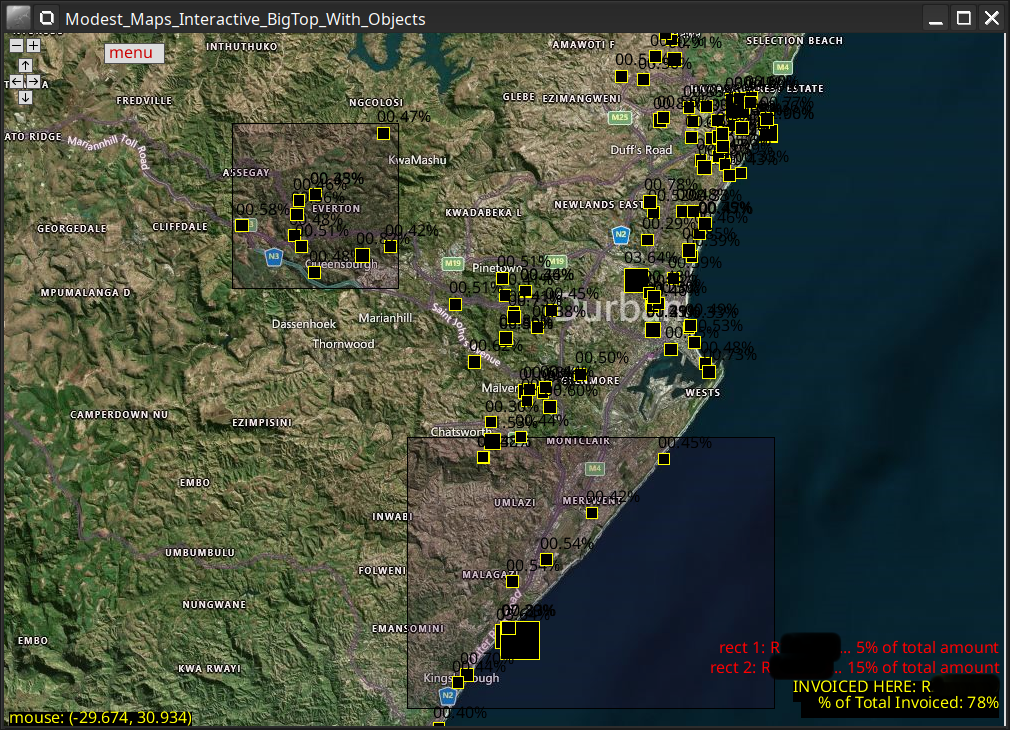
Once the geocoding is done, there are two options, map or details. The details page is basically the same but the points are larger or smaller depending on the amount.
Google geocoding is not completely accurate, so there is a bit of csv editing still to be done – some addresses may appear in different countries for example. Luckily fixing this manually is quite straightforward, you just find the correct location on google maps and then copy the “lat” and “lon” parts of the url from the browser address bar (just after the @ symbol).
The “Modest Maps” library for Processing has many options for tiling – I switched to the satellite view for the screenshots above, to avoid giving away sensitive information. Usually I use a street map view of course.
Purpose and functionality
The purpose of this app is mainly to see where all of our customers are booking us. This information is useful for marketing. When the program is running, two boxes can be drawn around areas on the map, and the text at the bottom compares the total invoice amount within those boxes. The map can be zoomed and panned, and a total for the whole page (with percentage) is shown for reference.
Comparing two zones
More possibilities
Since the pandemic is effectively over and we are back to full strength in terms of bookings, these statistics are now valuable again for my entertainment business. I plan on extending this simple app with more statistical visualisations – perhaps a colour map of distance from my house, and also pairing it with a database and more fields, like dates and type of booking. I could also automate the data entry, although that is rather trivial with a bit of spreadsheet manipulation, and I only really look at this a few times per year.
Many years ago I developed and published an Android app called “Made Up Stories” which I used to record the bedtime stories I told to my young son. Many of the stories were sanitized versions of movies and novels, but I also had a lot of fun creating my own characters and plots on the fly. Years later, I have a collection of over 300 stories saved, and I started to think that it would be nice to turn some of the original ones into illustrated children’s books – but the time it would take to transcribe these audio files was daunting. I am a reasonably fast typist, but not quite up to the speed of spoken word.
Transcription software
In 2019/2020 I decided to try out transcription software, so I fed a sample audio file into Mozilla Deep Speech and Google Speech to Text, among others. Unfortunately, due to my South African accent, none of the transcribers I tried had any accuracy, and I shelved the idea. Literally every second word was incorrect. Also, Deep Speech required a very specific audio sample rate, and Google Speech to text isn’t free (I had a free trial). *they may have improved by now, I didn’t check.
Discovering Whisper
Last week I saw an article on The Verge, which was singing the praises of “Whisper“, the new open source transcription engine. It was incredibly easy to set up, and best of all, ran entirely on my laptop, for free. After installation it is a simple one-liner on the command line to get your audio file into text format. Best of all, the thing is really accurate – I read in their paper that the model was trained on a more diverse range of speech, and uses a different approach to others. Well, for me at least, it works!
There is still a lot to do with the transcriptions, which come out as one long line of text – with barely any punctuation.. And don’t get me wrong, there are still some errors (admittedly I was using the “tiny” model – only 350mb, the “Large” model is apparently even more accurate but takes up 5-6GB of space.)
Finishing touches
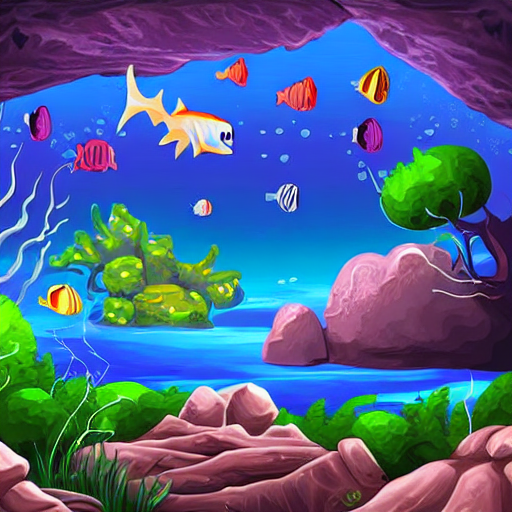
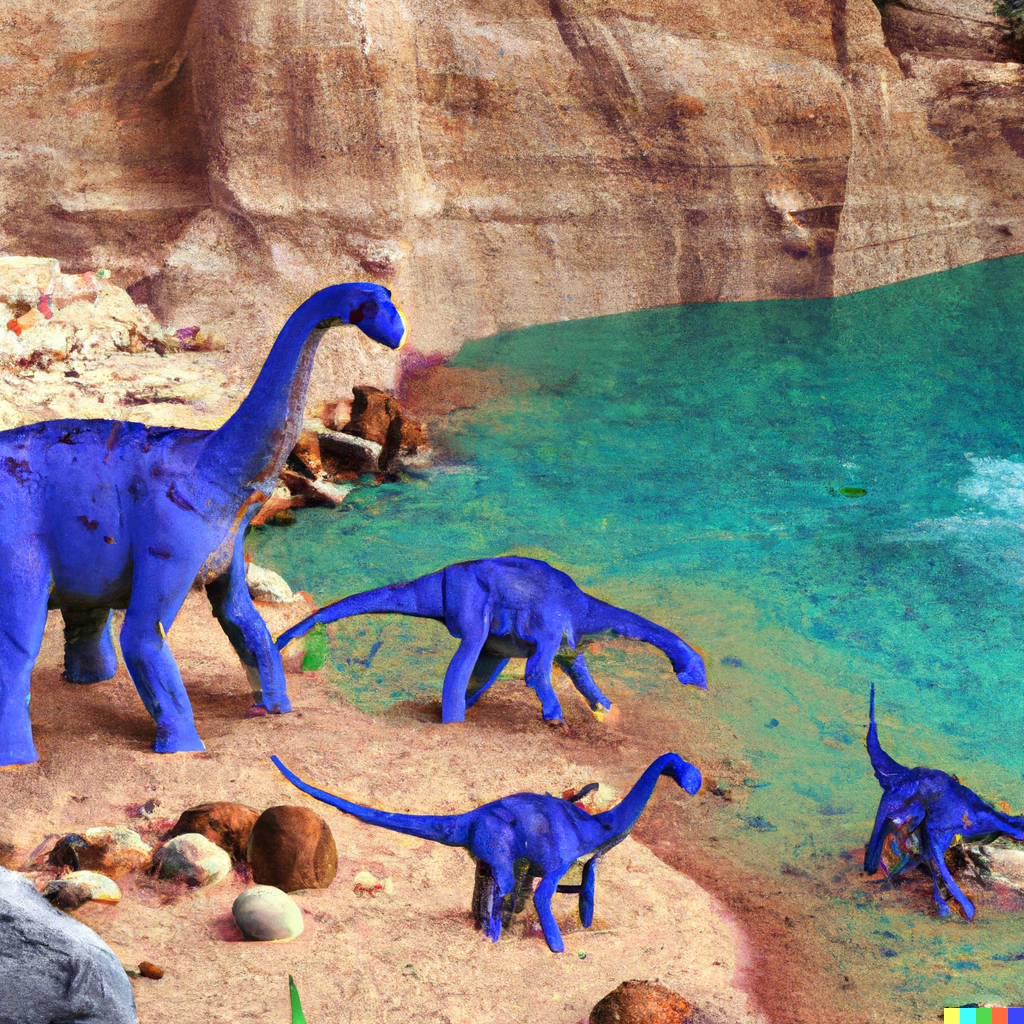
Well, I have cleaned up the first story, “Pinky the Amazon river dolphin visits the Mesozoic”. My wife is an amazing artist, and has agreed to illustrate, but I wonder, could AI help with that as well?
Dinosaurs on an ancient river bank – Craiyon generator
Underwater cave – Stable Diffusion
Maybe not.. (The dolphin images that I have managed to generate so far have only succeeded in making me feel ill.) I have signed up for “Midjourney” (which is DOWN at the time of writing). Apparently it is the best of the bunch – so who knows, maybe I can automate some backgrounds to save time illustrating the stories.
*Update: I signed up for DALL-E 2.
DALL-E 2 “Dinosaurs on an ancient river bank”DALL-E 2 “Underwater cave scene”
I’m definitely going to do a more in-depth comparison of all of these image generators in future!
Magic Poi, with the firmware written in Platform.io and the web interface in Flask is the future. Currently I don’t have a working set*, though, and due to upcoming shows I needed to make some changes to the existing Smart Poi.
*Due to other commitments, the company who are doing the hardware design for me have put the build on hold for now.
Updates:
LiPO batteries instead of NIMH
I have resisted using LiPO batteries for my projects up until now, but since I was already getting some for my K8 equipment upgrade I bought some 1000MAH LiPO batteries for the 32px poi. The voltage regulator I have in the circuit (LM117) is not optimal for these, I believe that it is not using the batteries full capacity – but it does work!
Quick uploading of offline patterns
At the time I wrote much of the Android app which pairs with Smart Poi (in 2017!), I was set on having all of the patterns stream from the smartphone to the poi over WiFi. In the real world unfortunately I found that due to WiFi interference this was not possible at most venues, where the 2.4GHZ spectrum is saturated and the stream stutters. So I made a way to upload and display patterns directly from the ESP8266 flash. Initially this was done with UDP as the streaming was taking place, then I moved over to http post. The latest update to the app disables UDP while the post is being sent, so uploads are really fast. I hope to refine this and port to the 72px version as well in the near future. You can get the apk for the latest version (so far only tested on Android 10) here – any future updates will be made to the same file. *Please note that the text message option still crashes, I am looking at this as a matter of urgency!Also, on first run the app sets up some example images and may need a restart (possibly even a phone reboot) to work correctly.
Magic Poi Lite version
I am working on a ‘lite’ single colour version of “Magic Poi”. The plan is to eventually replace all of my juggling equipment with internet enabled equipment which can sync using a web interface, like “Magic Poi”. The first test page is up here: http://magicpoi.circusscientist.com/lite and includes a colour change function and a really cool “Automatic Poi Simulator” visualisation which was kindly shared with me by Danny Thomas from kaien.com. Eventually this page will have a timeline (to music) function, and ability to download to the equipment. The firmware will also include offline capability, which will disable the WiFi to save power during operation.
Many thanks to all those who continue to support this project. Smart Poi continue be a part of my performance every week. I’m inspired by the thought of enabling more people to make reasonably priced POV poi and other LED equipment which can do as much as, or more than the commercial versions.
As always, if you haven’t already, head on over to the Smart Poi Overview page and sign up to the newsletter for occasional progress updates. Feedback is welcome.
PS: did you know that every time someone visits my website, an LED flashes on my desk? I made an online service and open source firmware for the D1 mini which means that almost anyone with a website can have the same functionality. Check out https://www.circusscientist.com/led-website-indicator/ if you are interested!


 into this: